


Did you know crystals aren't just for decoration? Crystals are everywhere around us from salt to snow. If you need some science fair project inspiration or just want to make fun keepsake crystals, then try out one of these crystal growing projects. Goodness, why not try them all? It's a simple and fascinating way to learn about crystals and how common such an extraordinary thing is.
 Rock Candy Rainbow Yum!
When you first think of crystals you may think of a fortune teller bending her eyes into reading a glassy future, or maybe you think of overhead chandeliers in glimmering hotels or your friend's favorite jeans with the snazzy back pockets. Do you ever think of salt? Because salt (also known as sodium chloride or halite crystals) is a crystal, as is sugar and snow.
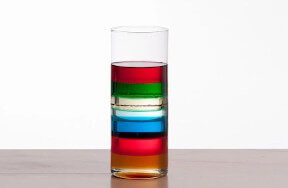
 Sugar Crystals
Now, prepare yourself for some science. Crystals are so common because the word crystal refers to any matter that is arranged in an ordered form. The units that are arranged can be molecules, atoms or ions which are all much too small to see with the naked eye, but whose arrangement gives crystals their characteristic structure. There are seven categories of crystal structures which are called lattices or space lattices.
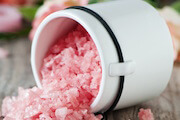
 Salt Crystals
Because of their certain structural characteristic, you can actually grow crystals! Well, not grow like you or a flower grows, but better to say build crystals, like you would build something with Legos. When the molecules of the to-be crystals (called solute) are bumping around each other in a liquid (called solvent) they like to stick together. There are other forces in the solution that cause them to pull back apart but once in a while you get two molecules that hang on just long enough to attract another molecule and then another and another until a crystal structure starts to form. The more solute in the solvent the faster your crystal will come together. This process of building crystals is called nucleation.
There are so many crystals to explore, play with and create. Here are just two types of crystals to whet your appetite, but know there are many many more out there waiting for you to discover them!
Crystal Needles
Crystal Needles are a great introduction to crystal growing. You can have some delicate, really cool crystals going within three hours time!
Ingredients:
- A cup or small bowl
- 1/2 cup Epsom salt (magnesium sulfate)
- 1/2 cup hot tap water
- (Optional) a drop of food coloring
Directions:
- Add the ingredients together in your bowl or cup.
- Stir the solution until all the salt is dissolved. There may be some crystals still at the bottom, but that's ok.
- Place the cup or bowl in the refrigerator and let sit for 3 hours.
- You can carefully scoop the crystals out of your bowl or cup to get a better look at them.
 The Needle Crystals are Quick and Delicate
Sugar Crystals
You may know Sugar Crystals by their other name, rock candy, or perhaps by their most common adjective, delicious! These take a little longer than the Needle Crystals to build, but they are easy enough to do and their taste is well worth the wait!
Ingredients:
- 1 cup water
- 3 cups table sugar
- Clean glass jar
- Pencil or butter knife
- String or yarn (do not use nylon string)
- Pan for boiling water and making solution
- Spoon for stirring
- (Optional) food coloring
 The Sugar Crystals Take Form!
Directions:
- Tie the string to your pencil or butter knife. The string should be able to hang into your jar without touching the bottom or sides.
- In the pan start boiling the water. You may want to ask an adult for help or let them know you're using the stove, just in case.
- Stir in the sugar one spoonful at a time. You want to make sure there is lots of the solute (in this case sugar) in the solution, but not so much that it doesn't all dissolve into the solution. If you have some undissolved sugar your Rock Crystals will start building onto those molecules rather than your string.
- Add a few drops of food coloring if you want some color to your candy.
- Carefully pour the solution from the pan into your clean glass jar. Make sure it's clean, otherwise crystals will build onto those molecules on the jar and not on your string.
- Balance the pencil or butter knife (with the string tied to it) on the lip of the jar and let the string dangle into the solution. Again, don't let the string hit the sides or bottom of the jar.
- Find a safe spot for your jar so it won't get knocked around or exposed to too much dust and debris.
- Check on your Rock Crystals the next day and notice how they're started to take form on the string.
- Whenever your Rock Crystals are the right size for your taste or when they stop growing go ahead and take them out of the jar and let them dry.
- Enjoy their sugary goodness!
 Homemade Rock Candy!Courtesy of Hallmarkchannel
Science Project:
If you're hoping to incorporate crystals into your next science fair project think about building a few different types of crystals and comparing their rate of growth, size, color, taste (when appropriate) and how long they last. You can discuss, like we did above, how crystals form and why. You could even try testing different materials to see if they will form crystal structures! Sugar forms crystals, does brown sugar form Crystals? How do they compare?
Get creative and impress your science teacher with your crystal knowledge!
Have Your Say!
What do think about when you think of crystals? Share it with us in our comments section below.
Related Articles
- What is The Periodic Table of Elements?
- Science Fair Project Examples and Ideas
- More Amazing Science Fair Projects