


Want to make your own mark? Can’t find that mark at the craft store in the rubber stamp aisle? Making your own stamps isn’t hard, in fact you just need some household items and a sense of creativity. And once you make your stamp you can use it anywhere again and again!


Materials:
- Plastic soda or water bottle lid
- Craft foam, any color
- Scissors
- Craft glue
- Paint or stamp pad
- Paintbrush
- Pencil
Instructions:
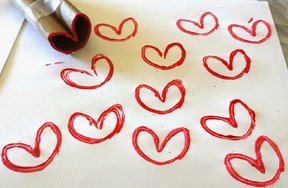
- With your pencil draw the shape you want for your stamp in the piece of craft foam. Make sure that it isn’t too big for the size of your lid.
- Cut that shape out with scissors.
- Glue the craft foam shape onto the lid and let it dry completely.
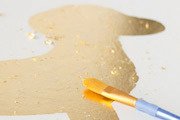
- Either using your stamp pad or paint, apply ink or paint to your stamp. If you’re using paint it might be helpful to use a paintbrush and apply the paint onto the stamp.
- Stamp paper, cards, cloth, whatever you want!
Feel free to add to your stamps by layering pieces of foam. This will add another dimension to the stamp and make the image all that more intricate. You can even paint different portions of your stamp different colors to get a multi-colored image.
Ideas for Your Stamps:
Now that you’ve made your customized stamps there are so many places you can use them. Think about making your own stationery with your stamp, you could even seal the envelopes with them. You could stamp large sheets of paper with your stamp and use the paper for gift-wrap. If you use fabric paint, which you can find at any craft store, you can stamp cloth and decorate your own T-shirts, tote bags, hats, anything cloth.
Have Your Say!
What ideas do you have for your stamps? Share it with us in our comments section below.
Related Articles: