


Look out Juan Valdez, we've got our sights set on your can - your coffee can, that is! All you need is an empty java tin, a few supplies and a little patience and you can make your own state-of-the-art camera. Okay, maybe not state-of-the-art but it's still pretty darn cool. Check it out!
What You Need
Putting Together Your Pinhole Camera
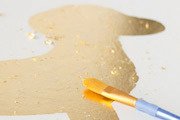
Step One: Paint the inside of your coffee can black. Pay special attention to the plastic lid and make sure to paint both sides. You may even want to give the lid a few coats.Step Two: Use the thumbtack to punch a hole through the metal end of the can (opposite the side the lid fits onto).
Step Three: Use a piece of electrical tape to cover the pinhole. Ta-da -You just made a camera.
Loading and Using Your Pinhole Camera
Now comes the tricky part - actually using the camera. The whole magic of photography is how light reacts with the film; a little bit of light, used in the right way, will produce a beautiful picture; too much light exposure to your film will ruin it. It's for this reason that you have to load your film in total darkness. Here's how to do it:Step One: Okay, you're going to need a darkroom but that's not as difficult to set up as it sounds. You need a room that's totally dark, like a bathroom without a window or a roomy closet. The safelight (which produces a reddish light) will be your only source of light.
Step Two: Once you're in your darkroom with only the safelight on, take out a sheet of photographic paper and reseal the package. Tape a piece of paper (which acts as your film) to the inside of the coffee can's lid with the shiny side facing the pinhole. You'll probably need to cut the paper to make it fit. Put the lid on the camera tightly. Now you're all ready to turn on the normal lights and go take a picture!
Step Three: Find something you want to take a picture of - your bike, a flower, whatever - and point the pinhole end of your camera towards it. It might be a good idea to use a piece of clay to prevent the can from rocking around.
Step Four: Remove the piece of tape covering the pinhole to allow the light to reach the paper film. You'll have to experiment with different exposures - try between 20 seconds and two minutes depending on how bright it is outside. Now replace the tape and you've taken your first photo.
Pinhole Photo-Taking Tips
Developing Your Pinhole Pictures
Since you're not using your average camera - or film - you can't just take your coffee can to the nearest one-hour photo hut and ask them to develop your picture. The easiest thing to do is to call around to your local photo labs and see who will develop the photo paper for you. Someone will do it and it shouldn't cost too much. To save yourself the effort of having to run to the lab every time you take a single photo, you can buy a special lightproof envelope to put all of your paper film into (in the safety of your darkroom, of course!) so you can take all your pictures to the lab in one trip. Happy Snapping!Related Stories:
Related Articles