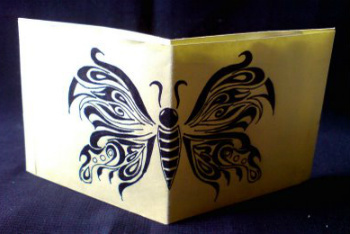
Do you need a new wallet for all that money you've been making with your summer job? Would you like one that’s the exact pattern, size and color you’ve always wanted? How about something light and durable? Well then, why not make your own paper wallet. It just takes some careful folding and you've got a brand new accessory!
Supplies:
- 8.5” x 11” Paper (standard binder paper)
- Tape
- Money and cards (to fill the wallet, not to make it)
Instructions:
- Place the paper vertically, like you would write on it for a school assignment.
- Fold the paper so you make 4 equal rectangles.
- Unfold the paper and fold it in half the other way.
- When you unfold the sheet you should have 8 credit card sized rectangles on your sheet of paper.
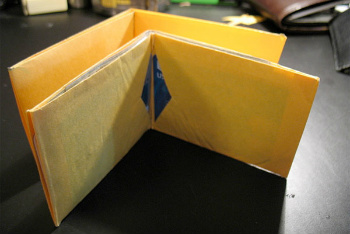
- With the paper positioned vertically, the third row of rectangles from the bottom will become your cardholder. Here you can cut away a shape in the middle of the two rectangles so you can access your cards. A diamond shape works best, though circles, hearts, stars, anything will do! It may be easiest to mark this row of rectangles, fold the sheet so the long edges are touching and cut away a shape along the crease, like you would to cut a heart shape.
- With the paper again spread out vertically, take your tape and apply a piece of tape to the side edges of the bottom most rectangle (this should be two away from the cut out one). Apply the tape so that half of it is on the paper and the other half with sticky side facing the table.
- Fold the top edge of the sheet and the bottom edge of the sheet to the middle crease. Fold it again so that you now see only two rectangles. This should position the cut away shape in the smack middle of your wallet.
- You should have some flaps of tape just hanging out there on the sides. Go ahead and fold those over the edge of the paper so that you tape the ends of your wallet shut.
- With the cut away shape facing upwards fold the paper so that the shorter sides of the rectangle are touching. You already have this crease in place.
- Bingo! There’s your wallet!
You may have already noticed this, but there is a long pocket for your bills, two middle pockets for your cards, but there are also another two secret hidden pockets for your cards, that you can access from the sides. Store the valuables there.
It’s best to use paper that is durable and won’t rip easily: the stronger the paper, the stronger your wallet. Think about using waterproof maps if you’re worried about your wallet getting wet. Or use thick wrapping paper if you’re more interested in the design.
Have Your Say
What kind of paper will you make your paper wallet out of? Share it with us in the comment’s section below!


