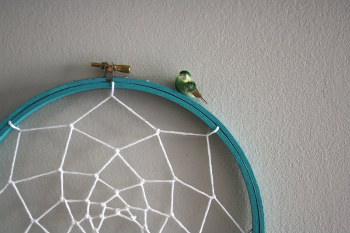
Usually when we sleep we don’t have any control over what we dream, but dream catchers can help keep bad dreams away. It’s an ancient tradition that might help you sleep sounder and focus your good thoughts into good dreams. It’ll be difficult to find the original sinew and willow bark to make a traditional dream catcher, but there are plenty of modern alternatives to create your own and individual dream catcher.
Dream Catcher History
Dream catchers have long been a tradition for Native peoples in North America. Originally from the Ojibwe people, dream catchers are meant to snare the bad dreams floating in the night air in their webbing and allow the good dreams to fall through the center hole in the dream catcher and into your sleeping head. When the sun rises in the morning the bad dreams trapped in the web disappear. Though records originate the dream catcher to the Ojibwe people, the practice was quickly adopted by other neighboring tribes and has even found a well known place in mainstream North America today.
The Legend
There are many legends to explain the design of the dream catcher. One of them says that long ago, when the world was young the trickster and teacher of wisdom, Iktomi, visited a brave leader of the people. Iktomi was disguised as a spindly spider. As Iktomi talked with the leader he wove a careful web, a circular web. Iktomi said, “There are many forces in life, good and bad. Take this web and let the bad forces catch in the webbing and let the good glide through the hole in the web and flow into you.” Iktomi handed the leader the web and told him, “Use this and your people will be great.” The leader shared the advice and web with all his people so that all his people had a web next to them as they slept and dreamed.
What You Will Need
- A strong hoop about 6 inches in diameter (Hint! An embroidery hoop works really well and you can find that at a craft shop)
- Thread, yarn or twine
- Feathers
- Beads
- Felt, a small rectangle
- Glue
What To Do
- Take your hoop and either wrap it with thread or yarn to cover it. Or if you rather, leave it as is. It’s up to you.
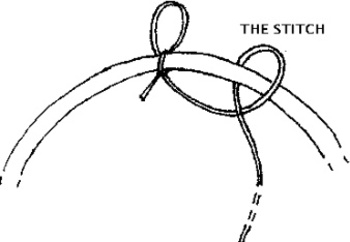
- Take a long piece of thread and tie it onto the edge of your hoop.
- About an inch and a half from that first knot wrap the thread over the hoop again.
- Put the thread between the loop you’ve made and the hoop. Almost like a little twist of the thread.
- Pull the thread taut. Again an inch and a half away make another stitch to the hoop, just like the one before.
- Keep going! This is the same stitch for your entire dream catcher! Whew, you thought there’d be more of that, huh?
- Once you get to the end of the first circle of stitches, meaning you’re back where you started knotting the thread to the hoop, instead of the hoop use the first line of stitches as your anchor and keep stitching away! Make sure that the loop stitch of teh second cirlce ties at the middle of the anchor string. That will pull the thread just right to make the dream catcher look like a web.
- If the beads you’d like to use fit onto your thread or yarn add them wherever you like in between stitches.
- Once you get to the center, knot the thread to one of the stitches and leave some length to the thread, you’ll use it to attach the feathers.
- If the beads you’d like to use do not fit onto your thread or yarn take smaller thread and sew them into some of the stitching now.
- Take the long end thread, your feathers, a small rectangle of felt and your glue. What you’re doing now is gluing the feathers to the thread. Then you will wrap where they meet with the felt. A dab of glue should be enough to join all those together.
- Attach a final loop to the top of your dream catcher so you can hang it above your bed.
- Have sweet dreams!
Have Your Say
What’s been the best dream you’ve ever had? Share it with us in the comments section below!


